Thursday, August 9, 2012

Princess Pixie

     Good morning to you all! I hope you are enjoying the remainder of the summer. Boy has it been humid!!! Today I am going to share another Copic project with you. The adorable digi stamp was a freebie bee from Pixie Dust Studios and I finally got a chance to color her. I have also included all the markers I used to color her. Are you ready???? Here she is:
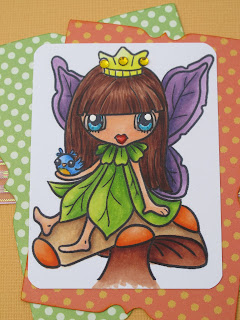
     Isn't she just the cutest little fairy with that pixie face? I started with the scraps of paper that were hanging around on my craft table and used my Copic chart to match my marker colors. Boy that really made the coloring go fast!!!
     This close up will give your a better idea. Here are the colors I used and the order in which I colored the image:
Face: E000,E00,E01,BV00, R20
Eyes: BG0000,BG02,BG05,BG07,W1,W3,W7
Hair: E25,E29,E31
Dress: YG17,YG21,YG25
Wings: V12,V15,V19,BV25
Mouth: R20,R22,R24
Mushroom-cap: E50,E53,E57
   -underneath and stem: E13,E15,E18
   -dots- YR01, YR02,YR07
Bird body: B21,B24,B26,Y15,Y17
Crown: Y00,Y04,Y06

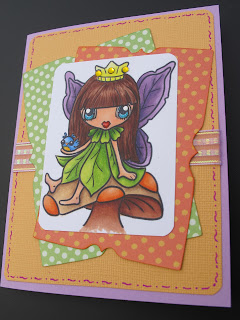
     I used the image from the Storybook cartridge by Provo Craft for the shaped pieces in the background. This can be found on page 67 of the hand book. A little doodling around the edge, some sparkly ribbon and of course some bling on the crown and she is done. I haven't decided on a sentiment yet but had so much fun coloring her.
     I hope you enjoy my creation and have a wonderful day.


Tuesday, August 7, 2012

Batman Door Hanger


     Welcome to My Cricut Craft Room  aka: WYEGW. Members of the Design Team were asked to use a phrase for our challenge this week but the catch is we could not use a main image but had to use the feature keys. This is such a great way to really explore your carts. For my project I am using Batman: The Brave and the Bold.
     Since we no longer have any children at home (yup believe it or not all 5 are out on their own! Once they graduated college they flew the coop and all are married except for the youngest.) Anyways I digress. I do watch 3 of the grand children 2 days a week and the oldest being 8 years old needed a space of his own. He took over one of the bedrooms but needed a sign to let his young sisters know he needed quiet time. Therefore I decided to make a door hanger for him. Here we go with the details:
     The door hanger is on page 73 and I cut it @ 7". I cut 3 layers in order to make it stronger.The phrase is on the same page using the feature key Layers:outfit. I cut this @ 5.50" and the shadow in black. I am going to show you how I deal with gluing on the individual letters when they are not welded together.
     I weed out the card stock that I am not going to use then, before I remove them from the mat, I use transfer tape and burnish well to make sure the letters are intact. You don't have to worry about it ripping the card stock because it is not really that sticky just supportive enough so the letters don't move.
     This is before I weeded out the card stock.

It also helps to trim the extra card stock down to size making it easier to line up on the shadow piece for placement purposes.
     As you can see I am able to nicely see where to place this on the shadow piece. While I had it on the transfer tape I used my Zig pen to glue it up and then just positioned on the bottom layer.
     Here is where I got into trouble, lol!!! I thought I would use my Xyron double sided laminate to keep it clean. No problem just load it in and crank it through. Trouble is I didn't make sure the laminate was under the bar like it was suppose to be. Here is what I ended up with:
     Will you just look at those creases !@#$%. I was going to start over but thought there must be a way to salvage this. Erica to the rescue. She always sends us extra goodies in our orders and guess what? I found these cute arrow eyelets in my stash. Look how I used them:


     Not only did I find the perfect phrase for WYEGW but I found the perfect way to salvage a project. If I didn't show you my boo boo WYEG  that there was a major mistake hidden in the project, lol.
     You can find this cart as well as all the supplies I used in this door hanger over at Erica's Store. She always has the best prices. Now please stop back @ My Cricut Craft Room and see what my fellow team members have to inspire you.
     As always I love hearing your thoughts on my project so please feel free to leave a comment.