

Welcome to My Big Fat Wedding Blog Hop. We are a group of a talented ladies who love paper crafting (well most of us) and will be show casing Our Amazing Creations along they way. If you are visiting from Tammy http://anonymouscricuter.blogspot.ca then you are
http://wwwpaperkraftsunlimiteddesings.blogspot.com
Blog Hop Giveaway is............ $10.00 Gift Card fom Ginger Snaps Scraps
Here is what I came up with:
Nautical Wedding Invitation
Now that I have been to the wedding shower and know everyone has received their invitations I can finally share the process!Becca wanted a nautical theme, not a beach theme so we looked for ships, anchors, and ship's wheels. Thankfully Provo Craft has Life's A Beach and I was able to find all that I needed along with Imagine More.
I presented her with the idea of a pocket type card to hold the reply card, reception and direction cards as well as the main invitation. I found the perfect kit by Wilton called the "String Of Pearls".
 This was a perfect selection for the outside since it had a wonderful crisp white with a nice satin sheen to it.
 This layout was just perfect for what we were looking for. It was very neat and organized and had a nice bead border almost like roping. The nice thing about this is that the template allowed me to change the font color and style so I could really customize these. Her colors are like a navy and a nice fresh green color so they were a very refreshing color to work with.
 I started by adding a band of navy satin ribbon. ( My oldest daughter suggested it. Hey ya gotta give credit where it is due, right!). I had found this roping at A.C. Moore in the yarn section. It has a nice satin sheen to it as well so it was just right for a classy wedding invitation. The image is from Imagine more and I changed the outer ring color to a more navy color but kept the inner ring and ship the same. This was cut @ 2" but I separated the layers but kept them at relative size so that everything was proportionate. I used a glue dot to secure the rope and image but made sure to bring the rope thru the ring.
 Here's the inside. Tada!!! First I used the Imagine More cart again. I chose the cut and print option and cut a 5"x7" with the same patterned paper as the inner ring of the life preserver. How cool is that? The outer layer is a blue card stock that also has a sheen. I bought that at Michael's from their recollections collection.In order to keep with the nautical theme I cut an anchor from Life's A Beach @ 1.25. Since I had to make 100 invitations I wanted to save some money on this project. There wasn't any silver card stock with the right color I wanted so I went to the canvas section @ M's and found this poster board for $4.00. I just cut it to 12x12 so I had 4+ sheets to work with. (Maybe there will be a lot of silver in my Christmas cards this year!)
Once everything was printed it tucked neatly into the pocket. The only thing I would do different would be to add a silver compass on the directions card. BTW speaking of directions card. The front has directions to the church and the back has directions to the reception. Rather than buy more cards to use for the back, I cut some card stock the same size,printed the directions and used my ATG gun to glue them together.
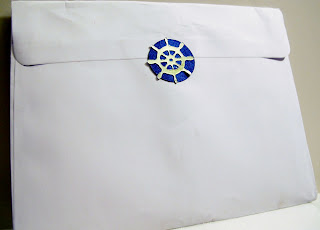 This is how the guests received their invitations. ( even though they were hand stamped, thank USPS for the wrinkled appearance, grrr). Bet you were wondering where the ships wheel I was talking about went to. Here is where it ended up! It is also from Life's A Beach and is also cut at 1.25". The circle behind it is from a circle punch with the leftover scraps from the blue background paper.
I presented her with the idea of a pocket type card to hold the reply card, reception and direction cards as well as the main invitation. I found the perfect kit by Wilton called the "String Of Pearls".


Ready for the finished product? Here ya go:


Once everything was printed it tucked neatly into the pocket. The only thing I would do different would be to add a silver compass on the directions card. BTW speaking of directions card. The front has directions to the church and the back has directions to the reception. Rather than buy more cards to use for the back, I cut some card stock the same size,printed the directions and used my ATG gun to glue them together.


I will leave you with one final picture. Of course it is of the wedding cake. Although I had nothing to do with this, I wanted to show you how wonderfully everything continued to carry out the theme.

As you can see the border includes small anchors.
Next you should head over to Jennifer and show her some love! Thank you so much for stopping by.


